
Tagged With: Software
dsbox-lightgpio , a command line interface for my lightswitches
Introduction
I’m writing a command line tool called dsbox-lightgpio to wrap GPIO and web services. Command can be entered as arguments or interactively.
for example
dsbox-lightgpio “hue get all”
or
dsbox-lightgpio
> all enable debug
> hue get all
> exit
I have finished coding handlers…
To get the status of all lights excerpt the office
hue get all -office
To set all lights on to white except turn the bedroom off and leave the office as is
hue set all=white bedroom=off -office
To brighten the lounge only if it is on already
hue set lounge?on=+5
To detect motion ( prints when there is motion detected, and when no motion has been detected for 60 seconds )
motion enable detection
To request a heartbeat timer event every 5 minutes ( 300 seconds )
timer heartbeat myevent=300
To cancel a timer
timer cancel myevent
To scroll a text message (once) on the 8×8 led matrix ( including a named icon )
matrix marque Hello world this is a test
To display a eye that winks ( and leave it on the display}
matrix animate “{eyeopen}{eyeoclosed}{eyeopen}”
I’m still coding handlers for …
To blink (once) the lights blue as a notification indicator and then return them tot heir previous state
hue blink all=blue
To gradually brighten a room to full red on a work day over a 30 minute interval (1800 seconds)
hue fade up 1800 bedroom=red
To gradually fade off the office ( if it is turned on ) over a 30 minute interval (1800 seconds)
hue fade down 1800 office?on
To detect taps and gestures on a touch device
touch enable detection
Micro-goals – Small scripts I want to run
Introduction
While developing my dsbox idea i’ve considered building on existing technologies but none of them provided exactly what i wanted. In considering what those technologies lacked, it helped shape something i hope to build, which i am calling Micro-goals
Technologies that didn’t offer what I wanted
- Linux cronjobs
- Yarn map reduce jobs
- Microservices
What I intend for DsBox Micro-goals
Micro-goals will consist of the following criteria
- when to run – the time window ( which may recur )
- where to run – based on hw & resources
- how many instances to run where 1 <= n
dsbox instances will be stopped and started, there will be no permanent leader/master, nodes will use consensus like protocols to agree what runs where. I hope to make this a hive setup with a shared set of goals that are small micro sized.
Software layers in dsbox and building a maintainable system
Introduction
The easy bit with software is writing it. Maintaining and upgrading software is hard but also the most important part . One trick used in software design is to use layers where each layer focuses on specific functionality. Each layer has a well defined set of dependency and assumptions on the layer above/below. Well designed layers allow independent maintenance and upgrades. Different software languages and threading models suit different layers.
The Software Layers
The layers I have plan to use in dsbox are
- Base operating system layer. DsBox currently runs on Raspberian Jessie.
- The management layer is a java process called dsboxcore which
- Uses Upnp to discover other instances and to be visible from local desktops
- Exposes a http (jetty) web interfaces for management
- Coordinates with its peer dsbox units to maintain a replicated file space.
- Provide a distributed reliable micro-goal scheduler. Think of this as a cross between lambda functions and a cron daemon.
- The utility layer
- c++ io modules to wrap hardware interactions into utility scripts
- The logic layer
- Initially simple python scripts with “if this then that” logic
- In the distant future smarter “learning” systems to predict what i want and respond to voice requests
The natural world
In a sense this models natural world. The base layer is the physical body. The second layer is the nervous system. Complex but atomic actions like breathing and seeing are the third layer. The final layer is the brain and reasoning.
Remote browsing/debugging of Pi using Eclipse IDE.
Introduction
Remote browsing and debugging in Eclipse is exactly what it sounds like
- Browse the remote Pi file system and drag/drop files from your windows/mad desktop
- Executing code on the remote Pi and debugging it with GDB
Remote browsing – Setup
- install the eclipse modules
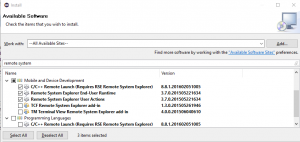
Install components for remote systems
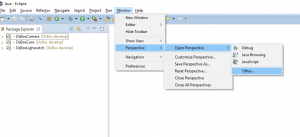
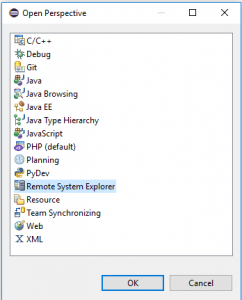
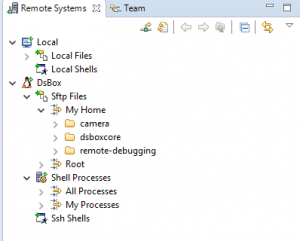
- Open the remote system perspective
- Configure the connection
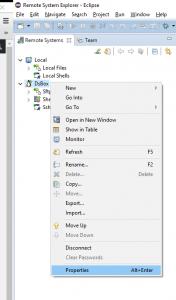
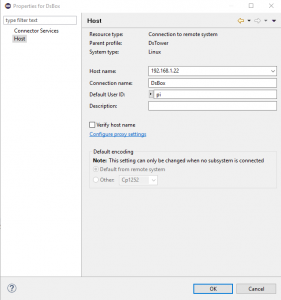
Setup the remote ssh connection details
- Enter the pi ssh password when prompted – explore your pi and drag/drop files folders as you wish
Remotely Debugging- Setup
- TBD
Boot disk custom image – Raspberry Pi
Why make a custom boot image
After some experimenting and playing, i had a memory card full of unorganized mini experiments, so i decided to start again with a fresh disk image. I had been using the full image from https://www.raspberrypi.org/downloads/raspbian/ but decided i wanted a minimal image. I also wanted my disk image to have my wifi details and ssh keys pre installed to avoid having manually edit the network setting each time i wanted to boot up a new raspberry pi. On my first attempt and making a custom boot disk i ended up with a 32GB disk image. After some googling and retrying i figured out a process to do what i wanted . This is how I made my custom image for the raspberry pi.
How I made my boot image
- On windows 10 I download the lite image from https://www.raspberrypi.org/downloads/raspbian/ and copied to two 32GB memory card using the tool Win32DiskImager
- I mounted the first memory card on the windows 10 host and edited the file “cmdline.txt” to remove the init=/usr/lib/raspi-config/init_resize.sh from the end of the boot command line
- Next I booted the pi up – it took short while the first time but eventually offered a boot prompt and i logged in with the standard pi/raspberry. I edited /etc/wpa_supplicant/wpa_supplicant.conf and added the details for my wifi
country=GB ctrl_interface=DIR=/var/run/wpa_supplicant GROUP=netdev update_config=1 network={ ssid="my_ssid" psk="my_password" } - I rebooted and the pi connected to my home network and i saw its IP on the screen. I checked the disk site to verify was still “small”
pi@raspberrypi:~ $ df -h
Filesystem Size Used Avail Use% Mounted on
/dev/root 1.2G 838M 288M 75% /
devtmpfs 459M 0 459M 0% /dev
tmpfs 463M 0 463M 0% /dev/shm
tmpfs 463M 12M 451M 3% /run
tmpfs 5.0M 4.0K 5.0M 1% /run/lock
tmpfs 463M 0 463M 0% /sys/fs/cgrou p
/dev/mmcblk0p1 63M 21M 43M 33% /boot
- I use cygwin on my windows pc so i was able to ssh to the pi using its new ip and scp over my public ssh key.
dolbyn@pc $ scp .ssh/id_rsa.pub pi@192.168.1.23:
pi@192.168.1.23's password:
id_rsa.pub 100% 395 0.4KB/s 00:00

dolbyn@pc$ ssh pi@192.168.1.23
pi@192.168.1.23's password:
- So that i knew things worked as i wanted ,I logged out of the ssh session and logged back .
- Satisfied things were good, I shutdown the pi, removed the memory card and remounted on my windows 10 pc. I edited the file “cmdline.txt” to re-add the init=/usr/lib/raspi-config/init_resize.sh from the end of the boot command line.
dwc_otg.lpm_enable=0 console=serial0,115200 console=tty1 root=/dev/mmcblk0p2 rootfstype=ext4 elevator=deadline fsck.repair=yes rootwait quiet init=/usr/lib/raspi-config/init_resize.sh
- After rebooting the image was resized . I wanted to capture the pre-expanded image so i plugged a usb SD card reasder/writer into the Pi. I plugged the second sd image into that one. I mounted the partitions and copied over the files i has working ont he current / first card. Finally i captured the first2 1.5 GB of the disk image and copied it back to my windows desktop. I now have a boot image that knows about mynetwork and public key.
pi@raspberrypi:~# apt-get install rsync pv

pi@raspberrypi:~# mount  /dev/sda1 /mnt/
pi@raspberrypi:~# cp /boot/config.txt /mnt/config.txt
pi@raspberrypi:~# umount /mnt

pi@raspberrypi:~# mount  /dev/sda2 /mnt/
pi@raspberrypi:~# sudo cp /etc/wpa_supplicant/wpa_supplicant.conf /mnt/etc/wpa_supplicant/
pi@raspberrypi:~# rsync -a /home/pi/.ssh /mnt/home/pi/
pi@raspberrypi:~# umount /mnt

pi@raspberrypi:~# sudo dd count=98304 bs=16k if=/dev/sda | pv | dd of=2016-05-27-raspbian-jessie-lite-dolbyn002.img bs=16k
Conclusion
Now i can make a clean disk whenever i want to start from a clean start but not have to reconfigure networking and credentials each time. I considered changing the default raspberry pi password but decided to do that at a later time. I expect as i evolve my project I will create further Bootstrapping images , but for today I have achieved what i wanted