
Tagged With: RaspberryPi
Prototype #3 Dsbox LightSwitch
Summary
Prototype 3 is almost the final assembly bus some more refinement needed. I’ll likely not consider the next iteration a prototype…
Outstanding Prototype issues
- My current capacitive touch sensor works intermittently through the plastic case/stud. I need to understand how to improve the effectiveness reliably
- The Camera mount is not perfectly centered to the fish eye lens . Next time will better place the mounting screws.
- I will try alternate glues because the base plate that the PI is connected to doesn’t stay connected well to the plastic case.
- I want to make the detection of the PIR sensor better so that it detects me in the room but avoids false alerts.


DsBox Light Switches as part of my Home Automation
Summary
After 40+ weekends my DIY smart light switches are working as part of my home automation. There is more to do but i’m pleased with what they do so far. I’ve now built 5 switches – one for each room of my apartment except the bathroom. These detect motion as i walk in and out of each room. The switches get/set attributes on a central mysql database and run an evolving logic python script that
- switches hue lights on in rooms during “evening/night” when there is motion
- maintains a ranked list of rooms by last activity seen
- keeps the light on in the most recent room with activity , and switches of other rooms after a period of inactivity.
- start/stop video recording of activity each room
The shared database allows for global or per room or per switch configuration of of sunrise/sunset times as well as other configurations. It also means a Grafana server can display metrics on switches and room occupancy. The shared mysql database and Grafana server run as docker containers running on a Synology NAS that also provides storage for video recordings and a central syslog service.
Future work to switches
- Adding the capacitive touch/dial to each switch so that they can be manually adjusted up/down/off etc. For the moment I’ve used a dummy cover until i can perfect the capacitive dial design.
- Remount some of the fisheye camera modules which are not centered as i would line them
- Adding/Evolving logic scripts to learn the appropriate brightness for each room at different times, to simulate activity when i am away based on observed usage, to track how long i spend working/sleeping/relaxing
- Auto update the sunrise/sunset times from https://sunrise-sunset.org/api
- Adding image recognition to the camera in the kitchen to read barcodes for shopping lists
- As screens improve i’d like to replace the 8×8 led matrix with a e-ink display. I do not think the tech is where i want it yet. in another 12 months I’ll re-evaluate
- Enabling me to view the Cameras remotely when i’m out to see if i left the oven on etc
The switches are the first of my DsBox projects based on small cheap compute modules working together to provide Home Automation. Eventually I may build a small AI to run distributed across the boxes. Its name will be “Leo” as a tribute to a tv character I admired.
Assembly and mounting of the switches


Prototype #1 of my smart light switch box
Putting the first prototype together
To prototype some ideas, I took an old lunchbox in the shape of a well known toy brick. I cut holes in the base and in some some studs from the lid. The base I stuck on the office wall over the light switch. In the lid of the prototype i put a camera with fish eye lens, a 8×8 led matrix, a PIR motion circuit all connected to a Raspberry Pi. Sliding the lunchbox lid onto the base and connecting a USB power line , my first smart lightswitch box prototype was ready for testing.
So far I have test software that from a pi command line via ssh can…
- turn my hue lights on and off
- detect motion in the room including when i am sitting at a desk
- take fisheye pictures of the room


Next
Next on my todo list is a python script to act as logic to…
- turn the office light on in the evening when there is motion so i dont need to
- fade off when there is period without motion to save electricity
- blink the lights red to remind me to take a break when i am in front of the pc too long
- possibly record a short snippet of video at the start of each detected motion ( ie when i enter the room ) so that i have a record of activity
I’ve also been prototyping some 3D printed objects for
- Holding the camera, PIR,Matrix on the outside of the box
- Mounting the Circuits and Pi inside the box
I hope to have the 2nd prototype ready at the start of July…
Remote browsing/debugging of Pi using Eclipse IDE.
Introduction
Remote browsing and debugging in Eclipse is exactly what it sounds like
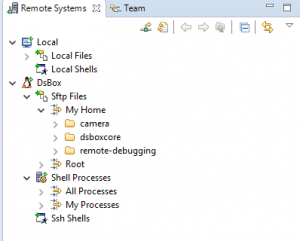
- Browse the remote Pi file system and drag/drop files from your windows/mad desktop
- Executing code on the remote Pi and debugging it with GDB
Remote browsing – Setup
- install the eclipse modules
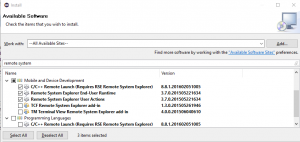
Install components for remote systems
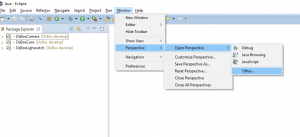
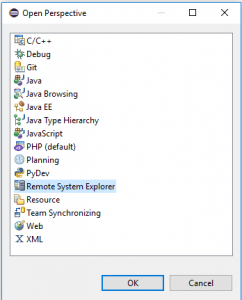
- Open the remote system perspective
- Configure the connection
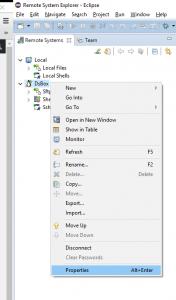
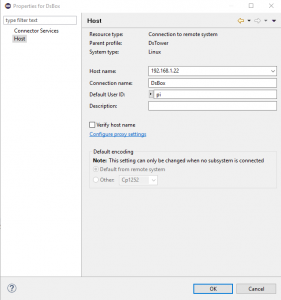
Setup the remote ssh connection details
- Enter the pi ssh password when prompted – explore your pi and drag/drop files folders as you wish
Remotely Debugging- Setup
- TBD
Boot disk custom image – Raspberry Pi
Why make a custom boot image
After some experimenting and playing, i had a memory card full of unorganized mini experiments, so i decided to start again with a fresh disk image. I had been using the full image from https://www.raspberrypi.org/downloads/raspbian/ but decided i wanted a minimal image. I also wanted my disk image to have my wifi details and ssh keys pre installed to avoid having manually edit the network setting each time i wanted to boot up a new raspberry pi. On my first attempt and making a custom boot disk i ended up with a 32GB disk image. After some googling and retrying i figured out a process to do what i wanted . This is how I made my custom image for the raspberry pi.
How I made my boot image
- On windows 10 I download the lite image from https://www.raspberrypi.org/downloads/raspbian/ and copied to two 32GB memory card using the tool Win32DiskImager
- I mounted the first memory card on the windows 10 host and edited the file “cmdline.txt” to remove the init=/usr/lib/raspi-config/init_resize.sh from the end of the boot command line
- Next I booted the pi up – it took short while the first time but eventually offered a boot prompt and i logged in with the standard pi/raspberry. I edited /etc/wpa_supplicant/wpa_supplicant.conf and added the details for my wifi
country=GB ctrl_interface=DIR=/var/run/wpa_supplicant GROUP=netdev update_config=1 network={ ssid="my_ssid" psk="my_password" } - I rebooted and the pi connected to my home network and i saw its IP on the screen. I checked the disk site to verify was still “small”
pi@raspberrypi:~ $ df -h
Filesystem Size Used Avail Use% Mounted on
/dev/root 1.2G 838M 288M 75% /
devtmpfs 459M 0 459M 0% /dev
tmpfs 463M 0 463M 0% /dev/shm
tmpfs 463M 12M 451M 3% /run
tmpfs 5.0M 4.0K 5.0M 1% /run/lock
tmpfs 463M 0 463M 0% /sys/fs/cgrou p
/dev/mmcblk0p1 63M 21M 43M 33% /boot
- I use cygwin on my windows pc so i was able to ssh to the pi using its new ip and scp over my public ssh key.
dolbyn@pc $ scp .ssh/id_rsa.pub pi@192.168.1.23:
pi@192.168.1.23's password:
id_rsa.pub 100% 395 0.4KB/s 00:00

dolbyn@pc$ ssh pi@192.168.1.23
pi@192.168.1.23's password:
- So that i knew things worked as i wanted ,I logged out of the ssh session and logged back .
- Satisfied things were good, I shutdown the pi, removed the memory card and remounted on my windows 10 pc. I edited the file “cmdline.txt” to re-add the init=/usr/lib/raspi-config/init_resize.sh from the end of the boot command line.
dwc_otg.lpm_enable=0 console=serial0,115200 console=tty1 root=/dev/mmcblk0p2 rootfstype=ext4 elevator=deadline fsck.repair=yes rootwait quiet init=/usr/lib/raspi-config/init_resize.sh
- After rebooting the image was resized . I wanted to capture the pre-expanded image so i plugged a usb SD card reasder/writer into the Pi. I plugged the second sd image into that one. I mounted the partitions and copied over the files i has working ont he current / first card. Finally i captured the first2 1.5 GB of the disk image and copied it back to my windows desktop. I now have a boot image that knows about mynetwork and public key.
pi@raspberrypi:~# apt-get install rsync pv

pi@raspberrypi:~# mount  /dev/sda1 /mnt/
pi@raspberrypi:~# cp /boot/config.txt /mnt/config.txt
pi@raspberrypi:~# umount /mnt

pi@raspberrypi:~# mount  /dev/sda2 /mnt/
pi@raspberrypi:~# sudo cp /etc/wpa_supplicant/wpa_supplicant.conf /mnt/etc/wpa_supplicant/
pi@raspberrypi:~# rsync -a /home/pi/.ssh /mnt/home/pi/
pi@raspberrypi:~# umount /mnt

pi@raspberrypi:~# sudo dd count=98304 bs=16k if=/dev/sda | pv | dd of=2016-05-27-raspbian-jessie-lite-dolbyn002.img bs=16k
Conclusion
Now i can make a clean disk whenever i want to start from a clean start but not have to reconfigure networking and credentials each time. I considered changing the default raspberry pi password but decided to do that at a later time. I expect as i evolve my project I will create further Bootstrapping images , but for today I have achieved what i wanted
Getting started with Raspberry Pi and SunFounder kit
I got started making things with raspberry pi boards this summer 2016. I had played with electronics kits as a child but gave it up because I did not have the patience. I took the plunge and ordered one from amazon along with a sunfounder kit with breadboard and assorted sensors.
I had read online and bought books about how to use a Raspberry Pi.
When the amazon package arrived, I downloaded jasper, copied it to a memory card and booted everything up. i felt a little underwhelmed by that first boot because it was so fast and easy that. So next i started playing with the sensors and the fun started. I experimented with an IR receiver and a utility called LIRC because I wanted to record the signals from my TV remote. Next I played with an IR transmitter circuit so that i could play the signals back to control my TV volume. I looked at the clock and the evening had vanished. This was fun.


