
Author Archives: David
Remote browsing/debugging of Pi using Eclipse IDE.
Introduction
Remote browsing and debugging in Eclipse is exactly what it sounds like
- Browse the remote Pi file system and drag/drop files from your windows/mad desktop
- Executing code on the remote Pi and debugging it with GDB
Remote browsing – Setup
- install the eclipse modules
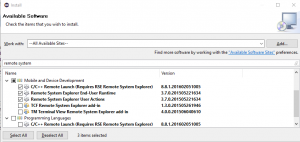
Install components for remote systems
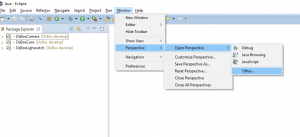
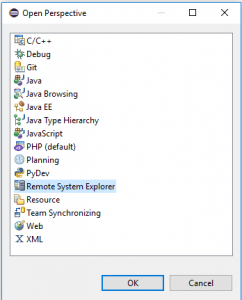
- Open the remote system perspective
- Configure the connection
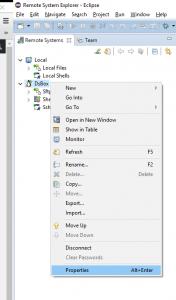
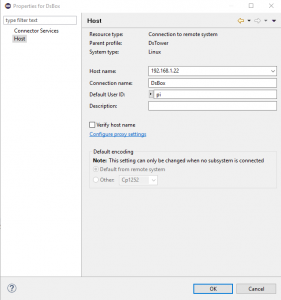
Setup the remote ssh connection details
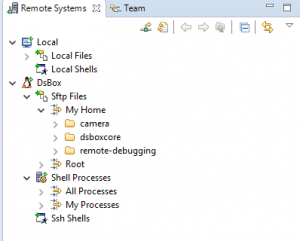
- Enter the pi ssh password when prompted – explore your pi and drag/drop files folders as you wish
Remotely Debugging- Setup
- TBD
Boot disk custom image – Raspberry Pi
Why make a custom boot image
After some experimenting and playing, i had a memory card full of unorganized mini experiments, so i decided to start again with a fresh disk image. I had been using the full image from https://www.raspberrypi.org/downloads/raspbian/ but decided i wanted a minimal image. I also wanted my disk image to have my wifi details and ssh keys pre installed to avoid having manually edit the network setting each time i wanted to boot up a new raspberry pi. On my first attempt and making a custom boot disk i ended up with a 32GB disk image. After some googling and retrying i figured out a process to do what i wanted . This is how I made my custom image for the raspberry pi.
How I made my boot image
- On windows 10 I download the lite image from https://www.raspberrypi.org/downloads/raspbian/ and copied to two 32GB memory card using the tool Win32DiskImager
- I mounted the first memory card on the windows 10 host and edited the file “cmdline.txt” to remove the init=/usr/lib/raspi-config/init_resize.sh from the end of the boot command line
- Next I booted the pi up – it took short while the first time but eventually offered a boot prompt and i logged in with the standard pi/raspberry. I edited /etc/wpa_supplicant/wpa_supplicant.conf and added the details for my wifi
country=GB ctrl_interface=DIR=/var/run/wpa_supplicant GROUP=netdev update_config=1 network={ ssid="my_ssid" psk="my_password" } - I rebooted and the pi connected to my home network and i saw its IP on the screen. I checked the disk site to verify was still “small”
pi@raspberrypi:~ $ df -h
Filesystem Size Used Avail Use% Mounted on
/dev/root 1.2G 838M 288M 75% /
devtmpfs 459M 0 459M 0% /dev
tmpfs 463M 0 463M 0% /dev/shm
tmpfs 463M 12M 451M 3% /run
tmpfs 5.0M 4.0K 5.0M 1% /run/lock
tmpfs 463M 0 463M 0% /sys/fs/cgrou p
/dev/mmcblk0p1 63M 21M 43M 33% /boot
- I use cygwin on my windows pc so i was able to ssh to the pi using its new ip and scp over my public ssh key.
dolbyn@pc $ scp .ssh/id_rsa.pub pi@192.168.1.23:
pi@192.168.1.23's password:
id_rsa.pub 100% 395 0.4KB/s 00:00

dolbyn@pc$ ssh pi@192.168.1.23
pi@192.168.1.23's password:
- So that i knew things worked as i wanted ,I logged out of the ssh session and logged back .
- Satisfied things were good, I shutdown the pi, removed the memory card and remounted on my windows 10 pc. I edited the file “cmdline.txt” to re-add the init=/usr/lib/raspi-config/init_resize.sh from the end of the boot command line.
dwc_otg.lpm_enable=0 console=serial0,115200 console=tty1 root=/dev/mmcblk0p2 rootfstype=ext4 elevator=deadline fsck.repair=yes rootwait quiet init=/usr/lib/raspi-config/init_resize.sh
- After rebooting the image was resized . I wanted to capture the pre-expanded image so i plugged a usb SD card reasder/writer into the Pi. I plugged the second sd image into that one. I mounted the partitions and copied over the files i has working ont he current / first card. Finally i captured the first2 1.5 GB of the disk image and copied it back to my windows desktop. I now have a boot image that knows about mynetwork and public key.
pi@raspberrypi:~# apt-get install rsync pv

pi@raspberrypi:~# mount  /dev/sda1 /mnt/
pi@raspberrypi:~# cp /boot/config.txt /mnt/config.txt
pi@raspberrypi:~# umount /mnt

pi@raspberrypi:~# mount  /dev/sda2 /mnt/
pi@raspberrypi:~# sudo cp /etc/wpa_supplicant/wpa_supplicant.conf /mnt/etc/wpa_supplicant/
pi@raspberrypi:~# rsync -a /home/pi/.ssh /mnt/home/pi/
pi@raspberrypi:~# umount /mnt

pi@raspberrypi:~# sudo dd count=98304 bs=16k if=/dev/sda | pv | dd of=2016-05-27-raspbian-jessie-lite-dolbyn002.img bs=16k
Conclusion
Now i can make a clean disk whenever i want to start from a clean start but not have to reconfigure networking and credentials each time. I considered changing the default raspberry pi password but decided to do that at a later time. I expect as i evolve my project I will create further Bootstrapping images , but for today I have achieved what i wanted
Smart lightswitches – Refined first goal
I have decided not to include audio ( microphones or speakers ) in the smart lightswitches i am creating.
The lunchboxes i am using to house my first home automation project have limited space. From research it seems speakers and microphones of quality would require more space and power. Motion detectors and switches are suited to doorways but I will not be facing that way when giving voice commands. I expect to listen to music or issue voice commands when i am seated in my lounge or laying in bed.
I’m re-framing my first goal as “smart lightswitches”. I will create modular smart boxes positioned over the light switches at the entrances to various rooms.My goal is for the boxes to detect and record which room I am in. They will enable smart control of lights, to track activity and occupancy.
I hope to include in each unit
- Fisheye NoIR Camera – to detect motion and light levels in each room – I am hoping to use a fish eye lens as wide coverage is more important than detail to me
- IR LED (940nm) – to send control pulses to tv and other devices , hopefully can also double as a IR light source when dark
- Rotary switch with push switch – to provide dimmer like control and other function selection.
- Adafruit 8×8 LED matrix (I2C) – to provide feedback of state etc
I still hope to add voice recognition and media playback to my home but I now expect to do that as a separate project as part of other units.
Fritzing- Great tool for designing electonics
I found a tool called Fritzing, It is a great tool which can help design and draw electronic circuits.
My initial thoughts and therefore untested plans are below. These Fritzing diagrams help give me an idea of what I need to purchase . They also provide a starting idea of how to assemble things. ( There was not a symbol for camera 🙁 )


Now I need to order some parts and stripboard…
The perfect box for DIY home automation
I began thinking about building a home automation box in each room with sensors because I wanted the house automated instead of just the lounge. The boxes would communicate over wifi because I want to combine that sensor data. I realized an optimal place for such sensors is near the entrance to each room because they can detect entry/exit.
Separately i had been thinking about how to cover my light switches. The switches always stay on because I have Philips hue bulbs.
I had a eureka moment and realized my new home automation could hide the light switches. I noticed that i already had a box that almost was the right size I like it for obvious reasons because of my childhood love of building things.


I ordered more boxes from amazon in white because they will match the decor. I made some modifications with a Dremel and knife. I’d already decided to have replaceable sensor/output modules because I want to evolve/replace modules over time. I cut holes in the box where i expected to locate the sensors, holes were the light switch plate would fit and holes for the power for a raspberry pi.


Getting started with Raspberry Pi and SunFounder kit
I got started making things with raspberry pi boards this summer 2016. I had played with electronics kits as a child but gave it up because I did not have the patience. I took the plunge and ordered one from amazon along with a sunfounder kit with breadboard and assorted sensors.
I had read online and bought books about how to use a Raspberry Pi.
When the amazon package arrived, I downloaded jasper, copied it to a memory card and booted everything up. i felt a little underwhelmed by that first boot because it was so fast and easy that. So next i started playing with the sensors and the fun started. I experimented with an IR receiver and a utility called LIRC because I wanted to record the signals from my TV remote. Next I played with an IR transmitter circuit so that i could play the signals back to control my TV volume. I looked at the clock and the evening had vanished. This was fun.


Home Automation Goal
I want to create a home automation system with the following
- Control my philips hue lights and cover the switches which now have to stay on.
- Detect and record motion in each room
- Control my tv
- Respond to voice commands
And because i am a programmer be…
- Distributed
- Scalable
- Flexible
I explicitly do not aim to build a personal assistant. I have a mobile phone with android for that. I want a smart home. My home doesnt need to view my emails or access my finances. My home doesnt need to view my browsing history. My home needs to do what it is told, take care of things when i am out and make my life simpler.